Orion XT8 SkyQuest 8″ Dobsonian Telescope Review

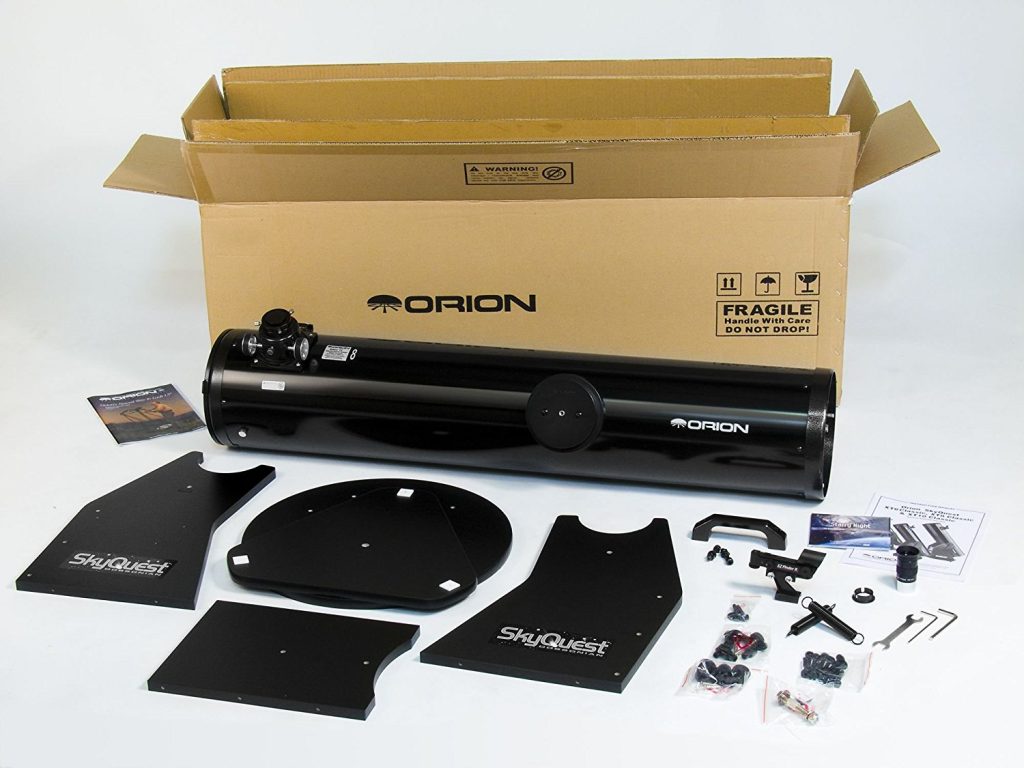
I have had an Orion XT8 SkyQuest 8″ Dob for a few years now and it has held up well. This telescope has offered up a nice view of a lot of objects but for some reason I have never written about it. Let’s change that. Here is a short Orion Skyquest XT8 review.

Orion XT8 Classic Dobsonian Telescope

Orion 8945 SkyQuest XT8 Classic Dobsonian Telescope

I bought this telescope several years ago and paid less than the Orion Skyquest XT8 price on Amazon, but like most things, prices have gone up a little and they have changed the scope a little. My old Orion XT8 came with a couple of eyepieces and I believe one of Orion’s Deepmap 600 maps which I love. The new one has eliminated one eyepiece and the map, but thrown in a few enhancements we will look  at.

This is the older version which only had a 1.25″ rack and pinion focuser whereas the newer ones seem to come with a 2″ crayford which I can say would be a huge improvement. While this older focuser is not nearly as nice and I can’t use it with 2″ eyepieces, it is still a solid unit.

The newer versions of the Orion XT8 and  my version both come with a red dot finder which is really cheap and flimsy. I much prefer Orion’s Orion EZ Finder Deluxe which sadly is not available any more. You can however get a Astromania Finder Deluxe Telescope Reflex Sight from Amazon which is almost an exact copy, yea!

The best thing about this scope is that it is a solid scope, both in build quality and image quality. My Zhumell Z8 scope is a much nicer scope to use than this Orion XT8 and came with better accessories, but for the money, this is an awesome starter scope and no one will regret buying one. 

Orion’s technical support is also first rate and should you run into any problems, the solution is a quick phone call or email away. You probably won’t need that however because this Orion XT8 is not only well built, but drop dead easy to assemble and use as well.

Opening the Orion XT8 box you find the tube in one section and the base/parts in another. Assembling the base was a simple matter of three side pieces and the bottom, along with a hand full of allen head screws for which they provided the tools. 

Orion XT8 unboxed

Once the base was assembled, you can just set the tube in the base and attach the side springs which put tension on the setup so the scope stays where you put it. Other telescopes I have used have adjustable tension while this one does not, but I fail to think of a scenario that a typical beginner would get into where that would be a problem. In fact, the only time I have used my tensioners on my Zhumell Dob is when I was doing something the telescope was never designed to do in the first place so I am not going to penalize the Orion XT8 for not having it.

About the only thing left is to slide the finder into the slot for it and tighten it down, then grab the eyepiece and start looking around.

Initial thoughts on moving the scope around are that it is pretty smooth in both altitude and azimuth movements. Years later, it is still remarkably smooth. As smooth as the more expensive scopes that use high end ball bearings for everything? Well no, but for much less expensive scope it is more than smooth enough and seems to keep that smoothness over the years. Using the teflon (I am assuming) pads on the altitude might actually be a really good thing as bearings can wear out and possibly corrode, the pads probably will not.

One of the down sides to any Dobsonian telescope, including this Orion XT8, is the cool down time. This is the time it takes for the telescope mirrors to adjust to the temperature outside. Typically you take the telescope from an air conditioned inside to an outside viewing location and the temperature can vary between the two locations by up to forty degrees. This temperature variance causes terrible viewing as the mirrors cool down (or warm up). Once the mirrors have equalized, the viewing is exceptional. Although not included with the scope, Orion does have a cooling fan that attaches to the back of the Orion XT8 to help it cool down faster.

Although I much prefer dual speed crayford focusers in my telescopes, the single speed rack and pinion in my Orion XT8 is pretty nice, and very functional. The newer single speed crayford in the new version of the Orion XT8 I am sure is an excellent focuser. Users I have talked to say it is very fast and smooth and a real improvement over the rack and pinion design.

25mm Plossl eyepiece that comes with the Orion XT8

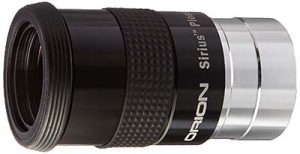
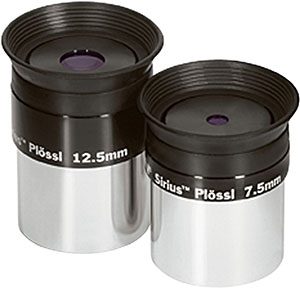
The 25mm eyepiece provided with the scope is a solid eyepiece for a beginner and provides excellent views of the moon, Andromeda galaxy, Orion nebula, and a host of other popular beginner targets. Unfortunately this one eyepiece choice can leave someone a little lacking so I would suggest you get an Orion moon filter and an Orion 12.5mm Sirius Plossl eyepiece to round things out.

Orion gives you a coupon for a download of some astronomy software included with the Orion XT8. I am not a fan. You can get Stellarium for free off the internet but really, who has a computer out next to their telescope unless they are doing astrophotography? Better options include Orion’s own Deepmap 600 which is awesome in the field, a nice Planisphere (be sure to select the right one for your location!) or any number of excellent phone/tablet apps.

If you wanted something a little nicer you could always go with Orion’s XT8 Plus. When looking at the orion xt8 vs xt8 plus, the plus includes adjustable tension, secondary mirror thumbscrews adjusters, two eyepieces, a 2x barlow and a dual speed crayford focuser for just $100 more:

Orion XT8 PLUS Dobsonian Reflector Telescope

Orion SkyQuest XT8 PLUS Dobsonian Reflector Telescope

Whichever Orion XT8 you decide on, you will have a telescope that should last for many years and provide excellent views.

I hope you enjoyed my little review of the Orion XT8 Dobsonian telescope!


Share this post! Facebooktwitterredditpinterestlinkedintumblrmail

Charles Messier, Astronomer Extraordinaire.

Most people interested in astronomy know the name Messier because they use the Messier Catalog for both visual astronomy and astrophotography. Charles Messier, the name behind the catalog, is not always so well known. I thought I would take this opportunity to introduce Charles Messier to you.

Portrait of Charles Messier

Charles Messier was born in Brandonviller France on the 26th of June, 1730. This was just north of Lac de Pierre-Percee and about 80km west of Strasbourg, France.  His mother Françoise B. Grandblaise, and father, Nicolas Messier had twelve children. His father worked in the Prince of Salm’s administration as a court usher and was well respected. 

Born into a wealthy family, Charles Messier enjoyed an excellent formal education, at least until his father died when he was eleven in 1741. His father’s passing sent the family into financial hardship forcing him to withdraw from his formal education. That same year, Charles fell out of a window and suffered several broken bones. He also mourned the passing of six of his eleven siblings. His education continued at home under the instruction of his older brother for the next eight years.

Despite all of this hardship, he was fascinated by astronomy. Much of this interest could be attributed to two celestial events in his youth, the appearance of the “Great Comet of 1744” (C/1743 X1) and the annular solar eclipse of the 25th of June 1748.

When he was twenty one years old, in 1751, Charles Messier began working for French Naval Astronomer, Joseph Nicholas Delisle. Delisle was originally instructed by Jacques Cassini, son of famous astronomer Giovanni Domenico Cassini. Delisle had also overseen the building of a new observatory in the palace of Cluny in 1747. Messier made the most of this appointment even though in the beginning it was little more than keeping the astronomical records of other astronomers.

He continued working on astronomy when he could, and his first astronomical observation was dated May 6, 1753. 

Charles Messier

This sped his advancement in astronomy such that in eight short years he became chief astronomer of the Marine Observatory. Five years later he was made a fellow of the Royal Society.

Charles Messier’s primary focus of space research was in comets, of which he discovered thirteen. He is most famous however for his list of bright objects in the skies of the northern hemisphere. This list came about because on the 28th of August 1758 while he was searching the skies for comet Halley and he noticed a stationary (as compared to the stars) fuzzy object in the Taurus constellation. Charles Messier noted this object so that it would not be confused with a possible comet sighting as he worked. This object went on to become know as Messier 1, M1, or the Crab Nebula. Over the years he cataloged over one hundred objects in his list. Years later researchers added a few that he had noted but not put on the list to bring the total to one hundred and ten.

Over the years, he discovered thirteen comets, they were:

  • C/1760 B1 (Messier)
  • C/1763 S1 (Messier)
  • C/1764 A1 (Messier)
  • C/1766 E1 (Messier)
  • C/1769 P1 (Messier)
  • D/1770 L1 (Lexell)
  • C/1771 G1 (Messier)
  • C/1773 T1 (Messier)
  • C/1780 U2 (Messier)
  • C/1788 W1 (Messier)
  • C/1793 S2 (Messier)
  • C/1798 G1 (Messier)
  • C/1785 A1 (Messier-Mechain)


Charles Messier himself decided to create the list, saying:

“What caused me to undertake the catalog was the nebula I discovered above the southern horn of Taurus on September 12, 1758, whilst observing the comet of that year. This nebula had such a resemblance to a comet in its form and brightness that I endeavored to find others, so that astronomers would no more confuse these same nebulae with comets just beginning to appear. I observed further with suitable refractors for the discovery of comets, and this is the purpose I had in mind in compiling the catalog.

After me, the celebrated Herschel published a catalog of 2000 which he has observed. This unveiling the heavens, made with instruments of great aperture, does not help in the perusal of the sky for faint comets. Thus my object is different from his, and I need only nebulae visible in a telescope of two feet [focal length]. Since the publication of my catalog, I have observed still others: I will publish them in the future in the order of right ascension for the purpose of making them more easy to recognise and for those searching for comets to have less uncertainty.”First pages of the Messier catalog

Both M1 and M2 were objects that had been previously discovered, by one of the most famous English astronomers, John Bevis in 1731 and Italian astronomer Giovanni Domenico in 1746 respectively. Charles Messier’s first true discovery was the globular cluster M3 in the Canes Venatici constellation on the 3rd of May 1764.

When he was 40 years old, on November 26, 1770, Marie-Francoise de Vermauchampt became Mrs. Charles Messier. Charles had met her in 1755 at Collége de France.  On March 15, 1772 Marie gave him a son, Antoine-Charles Messier. Unfortunately she died from complications eight days later. Antoine was not much luckier as he passed away only three days after his mother. Charles Messier never remarried.

Despite failing eyesight, partial paralysis and a stroke, Charles Messier continued to work virtually up to the last days of his life. He passed away on April 11th, 1817 at the age of 87. He was buried in the Père Lachaise cemetery in Paris

Charles Messier‘s list continues today as the single most recognizable list in astronomy. This popularity was probably due to the fact that it is relatively easy to observe all of the Messier objects with nothing more than a reasonable set of binoculars. Many of the targets are quite visible even with the naked eye such as M31, M42 and M45.

Sign honoring Charles Messier

Messier is one of the most famous French astronomers and at the top of any list of astronomers you may find in any astronomy book. He has both an asteroid and a lunar crater officially named after him.

Awards and accolades for Charles Messier:

  • Fellow of the Royal Society
  • Foreign member of the Royal Swedish Academy of Sciences
  • Elected to the Académie Royale des Sciences in Paris
  • Selected as a member of the Academy of Harlem in the Netherlands
  • Foreign member of the Royal Society in London
  • Member of the Academy of Auxerre
  • Member of the Institute of Bologne
  • Awarded the Cross of the Legion of Honor by Napoleon Bonaparte in 1806

Beginning and advanced astronomers alike enjoy the objects Charles Messier gave us. His catalog is often used in “Messier Marathons” that attempt to see as many of the objects as possible in a short period of time. These marathons can be as short as one night. It is also fairly common for amateur astrophotographers to attempt to image all 110 of the objects as a kind of “right of passage”.

One problem with Charles Messier’s list is that it only contains objects from the Northern Hemisphere. This makes sense because he only observed from that location. Other lists such as the Caldwell list have sought to become an addition to the Messier list and include objects from the Southern Hemisphere as well.

If you would like more information on Charles Messier, check out this excellent biography.

If you want to know more about the objects that Charles Messier cataloged, you might be interested in my book, the Messier Astrophotography Reference.

I hope you enjoyed reading about Charles Messier!


Share this post! Facebooktwitterredditpinterestlinkedintumblrmail

Recommended Telescope Eyepieces

I am constantly seeing people asking for eyepiece recommendations so I thought I would address this problem. To start, I have created a video on my YouTube channel talking about the basics of eyepieces. You can see this video at https://youtu.be/KTB_C6v0rQw.

Recommended telescope eyepieces

Even after learning more about eyepieces, the question remains, what eyepieces are worth investing in? To solve this problem I have created a list which attempts to give you a recommendation for brands and models of eyepieces over several different price points. Keep in mind that these are generic recommendations for most people but there are always exceptions based on specific telescopes and targets. For example, fast Dobsonian telescopes usually require higher quality eyepieces than a long refractor will.

I am creating my list using a 17mm eyepiece. This is a nice middle of the road size and provides nice views with virtually any telescope. In addition, almost every manufacturer makes a 17mm or very close to it so that made the comparison easier. With no further delay, here are my personal recommendations.

Eyepiece

Field Of View Eye Relief Price   Recomended Sizes
Orion Sirius Plossl 17mm 52 11 $30.00   25, 17
Celestron X-Cel 18mm 60 16 $65.00   25, 18, 9
Orion Stratus 17mm 68 20 $130.00   24, 17, 13
Baader Morpheus 17.5mm 76 19 $239.00   17.5, 12.5
Televue Nagler 17mm 82 17 $410.00   31, 17, 9

These suggestions are based off what I own and have personally used. There are lot of other brands and models available, some didn’t make the list because I do not recommend them and some because I have not used them. When in doubt, you can always ask.

I suspect the Orion Sirius Plossl is the same eyepiece from several other people such as Vixen and Highpoint with just a different name stamped on it. I like the Orion because I have always received a good quality product for the money I spent so I tend to stick with the Orion name even if the Vixen is a few dollars cheaper. Better safe than sorry.

The Orion Stratus is probably the same as the Baader Hyperion so either would be fine. Since I have used a lot more Stratus eyepieces than I have Hyperions I listed them here. I  also  like the color of the Stratus eyepieces better than the Hyperion, heh.

I currently own all the brands and models listed in my chart except the Morpheus. I have used a couple, but never owned one. I have a lot of Baader filters, and a nice set of Stratus eyepieces which I have had great luck with so I have no reason to think the Morpheus line will be any different. The couple I used were excellent.

The sizes I recommended are for a “typical” telescope. If in doubt of what sizes you may need, I recommend you get the 17mm first, then use that one for a while and see if you consistently want something with more or less magnification and use that to determine what to purchase next.

Good luck and clear skies!


Share this post! Facebooktwitterredditpinterestlinkedintumblrmail

Astrophotography tutorials, reviews, and more on YouTube.

I have had a YouTube channel for a long time but never really developed it until recently. Now I have started putting up astrophotography tutorials, astrophotography videos, reviews, and much more at a breakneck pace mainly aimed at astrophotography for beginners. Just last weekend I put around five videos up with several more in process.

Astrophotography tutorials, reviews, and more on my YouTube channel

Just this weekend I added the following videos:

I have also redone several of the existing astrophotography videos to bring them up to HD (1920 x 1080 @ 30fps) so they look better.

If you have a astrophotography tutorial or video topic you would like for me to cover, use the contact form to let me know. I will be covering anything and everything I can come up with for a while to help build the channel. If you are interested in contributing videos to the channel, let me know as well.

Most of the videos there, and the ones I have planned are designed for the astrophotography beginner. Many were originally designed to augment my books which include several that are a beginner’s guide to dslr astrophotography. If you have ever wanted to know how to take pictures of the night sky, drop by and take a look at some great astrophotography videos.

Be sure to subscribe to my astrophotography videos channel!


Share this post! Facebooktwitterredditpinterestlinkedintumblrmail

Brightest supermoon in seventy years

Last night was the brightest supermoon in seventy years, or so they say. Unfortunately I was not doing anything special for the occasion although I did get to spend a few minutes out at the observatory and took a few pictures.

So what exactly is a supermoon? Let’s start answering that question with the fact that the moon’s orbit around the earth is not a perfect circle but more of an ellipse. At times that means the moon is closer to the earth than at other times. A supermoon is when you have a full (or new although you can’t really see it then) moon at the same time as the moon is at it’s closest point in it’s orbit of the Earth.

Put a little simpler, it is when the moon is full and close at the same time.

What this means to us astronomers and astrophotographers is that the moon appears bigger and brighter than at any other time.

Supermoon rising over the observatory domeThis image is the moon rising above the observatory dome. Unfortunately unless you are familiar with the SHSU observatory and what the moon typically looks like out there, you may not see that this does indeed look pretty big. It was an impressive sight.

This next picture should get your attention however:

Supermoon backlighting the observatory domeMost people would guess that this is the observatory dome right before sunrise, or sunset. They would be wrong. This was taken at 7:09pm CST facing east (the sun sets in the west, so behind me, not behind the dome). The light you see is the moon about 20 degrees or so above the horizon.

Yes, it was that bright. How bright? Reading a printed book with nothing but moonlight was not only possible, but quite easy.

When is the next supermoon?

If you missed it never fear, the next supermoon is scheduled to appear on December 3rd, 2017. It will not be quite as spectacular as this one however. If you want something this amazing you will have to wait until November 25th, 2034!

Until the next supermoon, Clear skies!


Share this post! Facebooktwitterredditpinterestlinkedintumblrmail

How much do dark skies really matter?

If you are even a little into astronomy or astrophotography you will hear people extol the virtues of “really dark skies”, but do dark skies really make that much of a difference? The short answer is yes, dark skies are crucial, what follows is a somewhat longer answer 🙂

Dark skies are rare in the US

Dark skies map of the US

I planned a trip from where I live in Huntsville to a little town in south west Texas named Terlingua. Terlingua is pretty much right in between Big Bend Ranch State Park and Big Bend National Park just a few miles from the border with Mexico. It is home to a real 1800s mining ghost town and 58 residents as of the last census. That is not an error, fifty eight people live there. There isn’t even a gas station in town, you have to drive five miles up the road to Study Butte for that and you better do it before 9PM or they will be closed. This area is home to some of the darkest dark skies in the nation as you can see from the dark sky map above. This is one of the few places with no light pollution in the Texas.

I picked Terlingua because I had seen some amazing pictures from photographer Lance Keimig from this area which I wanted to try my hand at. His night photography with light painting (where you add light to an object in the scene and have that mix with the natural light, such as from the stars or moon) was just fascinating. There was just no way I could do that kind of work with the light pollution around here, much less without that kind of cool scenery.

In picking the date I needed to maximize the dark skies and that meant a new moon, the Milky Way up somewhere in the middle of the night, good weather and if I could get other objects in the picture as well, that would be a bonus. The first weekend in June looked good as it had the new moon, the Milky Way would be up high at about 1am, and both Mars and Saturn would be close enough to the Milky Way to be in the shot. The weather, as anyone from Texas will tell you, could be anything.

The ten hour drive was typical until we passed Austin a hundred miles or so when things began to change. Trees started to get much smaller, grass started to disappear, larger and larger hills appeared and everything started to get rocky and sandy. Slowly cacti stated to replace shrubs in popularity.

We arrived on a Friday afternoon, checked into our motel, ate dinner in the motel’s restaurant (where they had amazing Mexican food cooked by a guy from Ireland) and took a little driving tour of the ghost town (which we were less than a quarter mile from down the road the motel was on) to find suitable places to shoot from. Finally we took a nap. Getting up at midnight would have been hard any other time but I was truly excited to try my hand at this. I had never been in these kinds of dark skies, rarely shot anything at night other than astrophotography, have never tried light painting, and had never gotten anything resembling a good Milky Way shot.

Picture showing dark skies over Terlingua

One of my shots the first night out, cropped but otherwise the JPG right out of the camera.

That first night I did a lot of shooting, learned a lot, made a lot of mistakes and as I was heading back to the motel I noticed an old rusty car with a light in front of it. It looked interesting so I stopped and took a closer look. The light was one of those you stick in the ground and it uses a solar cell to charge during the day, turning on at night automatically. This light was just laying there under a piece of plastic pipe, not stuck in the ground as it normally would be. I thought about moving the light or covering it with a blanket but my test shot showed me something interesting; the light almost made it look like the headlights on the old car were on and shining on the ground.

I had already determined that I could shoot about 30 seconds without getting too much star trailing using my 10mm lens, D7000 camera at ISO 3200. Balancing the existing light and adding just the right amount of light painting with my headlamp on low to the passenger side of the car was the trick. After a few test shots to get the lighting right, and the focus (you have to manually focus for these types of shots) I was happy enough to start clicking off real frames. This was about the third try and as soon as I saw it on the screen I knew that I wasn’t going to get any better so I packed up an went in for the night.

The image you see above is completely unedited other than a crop and resize. In fact I have my camera set to take “RAW + JPG Basic” and this is the basic JPG file, not a RAW conversion. I can’t wait until I have time to work with the RAW file. This will probably be the first print I ever do as a 20″x24″ metal print. Note the colors in the sky, not just the single stars, but in the Milky Way. How about the amount of structure and detail? All of this without editing at all, amazingly dark skies!

terlingua02

A shot from the second night out, unedited.

The second night out was just as amazing. I could walk out my brightly lit motel room, look up and almost immediately see the Milky Way even with a porch light three feet from my head on the right. Simply amazing. That really tells you how dark skies affect your vision of celestial objects.

The image above was taken next to the ruins of one of the miner’s homes from the late 1800s. I did not light paint this one as the red glow from a nearby cabin light gave it exactly the right amount of ambient light. This was another 30 second exposure at ISO 3200.

If you can do this with nothing but a tripod and consumer DSLR for the Milky Way, image what you can do with your astrophotography equipment and deep sky targets? I absolutely want to go back and see. Dark skies do make a huge difference.

If you want to see more images shot in these dark skies, and even some in daylight, I will soon be posting them on my photography website over at www.paperbirdimages.com so go take a look.


Share this post! Facebooktwitterredditpinterestlinkedintumblrmail

Five planets in the morning sky

This morning I viewed five planets aligned and the moon in the morning sky. It was a simply amazing sight. I had to get up really early in the morning to get out to the dark site so that I could spend a little time imaging, and a lot of time just admiring the view, and still go to work the next morning.

Five planets in the sky

Screenshot from Stellarium showing the position of the five planets at approximately the time I was viewing them

The five planets that were visible were Mercury, Venus, the Moon (yes, not a planet, but still a wonderful addition to this lineup), Saturn, Mars and Jupiter in that order from west to east along the ecliptic. What you don’t hear about is that Pluto is actually there as well just to the left of Venus on the screenshot above. I was not into astronomy the last time there was a five planet alignment back in late 2004 and early 2005 and it was a little different with the order of Mercury, Venus, Mars, Jupiter and then Saturn. Depending on when you observed back then you could get the moon in there as well. I was not about to miss the 2016 planet alignment!

Three of the objects in the sky

The moon, Venus and Mercury on the morning of the 5th.

It was a cold morning, just below freezing when I arrived at the dark site. The air was calm and clear. Once I set up my equipment and let my eyes adjust to the darkness the planets just jumped out of the sky. The moon, Arcturus and Vega also begged for attention. Even with five planets in the sky the real action for me was in the rising Sagittarius which contained Mercury, Venus and the moon.

I had of course seen all of these five planets before, but only once for Mercury, and I had never imaged it. It is far too small and bright for my equipment to do anything but render Mercury as a bright point of light just like Vega, but in a wider field with its neighbor, it was spectacular.

Venus is the most difficult I have imaged before, and for my equipment I think I have a pretty amazing image. After many sessions, tons of attempts, and more hours than I care to admit I finally got an image of Venus which showed something besides a bright dot. In the image below you can clearly see the shading on the clouds that cover the planet, amazing.

Venus

My attempt at Venus, click to enlarge and see the cloud shading

This image required the use of a video camera instead of my typical DSLR or CCD cameras. Stacking hundred is images is the only way I could get something this clear of something this small. Even with this setup, Mercury is far too small to pull this off.

Mercury is the most difficult of these five planets to image and my next chance to image it with any real meaning will be the transit on May 9th, 2016. May is a terrible weather month but I will be keeping my fingers crossed. I got lucky enough with the Venus transit so I guess it could happen again.

I hope you enjoyed my article on the five planets!


Share this post! Facebooktwitterredditpinterestlinkedintumblrmail