If you are even a little into astronomy or astrophotography you will hear people extol the virtues of “really dark skies”, but do dark skies really make that much of a difference? The short answer is yes, dark skies are crucial, what follows is a somewhat longer answer 🙂
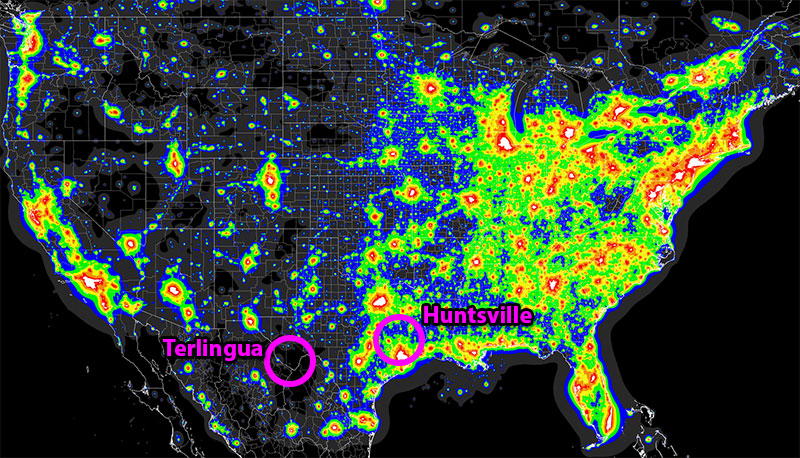
Dark skies map of the US
I planned a trip from where I live in Huntsville to a little town in south west Texas named Terlingua. Terlingua is pretty much right in between Big Bend Ranch State Park and Big Bend National Park just a few miles from the border with Mexico. It is home to a real 1800s mining ghost town and 58 residents as of the last census. That is not an error, fifty eight people live there. There isn’t even a gas station in town, you have to drive five miles up the road to Study Butte for that and you better do it before 9PM or they will be closed. This area is home to some of the darkest dark skies in the nation as you can see from the dark sky map above. This is one of the few places with no light pollution in the Texas.
I picked Terlingua because I had seen some amazing pictures from photographer Lance Keimig from this area which I wanted to try my hand at. His night photography with light painting (where you add light to an object in the scene and have that mix with the natural light, such as from the stars or moon) was just fascinating. There was just no way I could do that kind of work with the light pollution around here, much less without that kind of cool scenery.
In picking the date I needed to maximize the dark skies and that meant a new moon, the Milky Way up somewhere in the middle of the night, good weather and if I could get other objects in the picture as well, that would be a bonus. The first weekend in June looked good as it had the new moon, the Milky Way would be up high at about 1am, and both Mars and Saturn would be close enough to the Milky Way to be in the shot. The weather, as anyone from Texas will tell you, could be anything.
The ten hour drive was typical until we passed Austin a hundred miles or so when things began to change. Trees started to get much smaller, grass started to disappear, larger and larger hills appeared and everything started to get rocky and sandy. Slowly cacti stated to replace shrubs in popularity.
We arrived on a Friday afternoon, checked into our motel, ate dinner in the motel’s restaurant (where they had amazing Mexican food cooked by a guy from Ireland) and took a little driving tour of the ghost town (which we were less than a quarter mile from down the road the motel was on) to find suitable places to shoot from. Finally we took a nap. Getting up at midnight would have been hard any other time but I was truly excited to try my hand at this. I had never been in these kinds of dark skies, rarely shot anything at night other than astrophotography, have never tried light painting, and had never gotten anything resembling a good Milky Way shot.
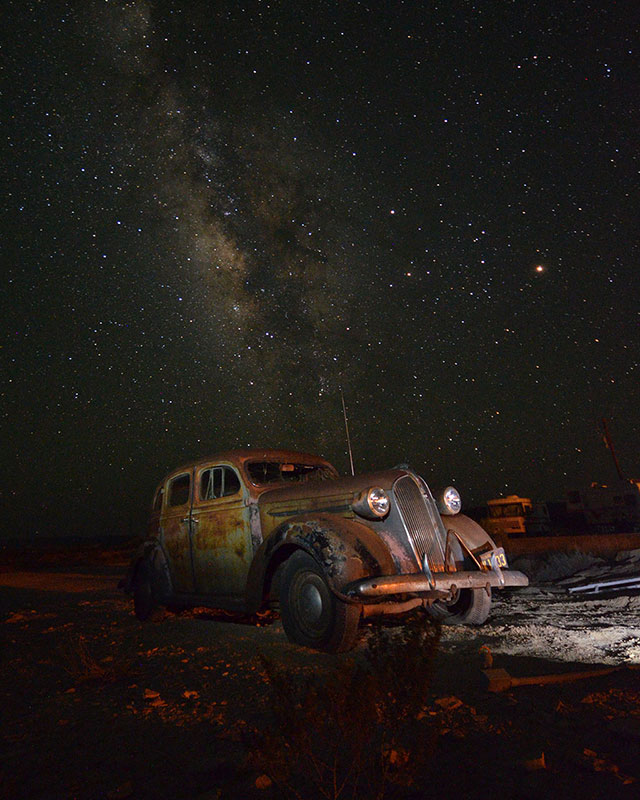
One of my shots the first night out, cropped but otherwise the JPG right out of the camera.
That first night I did a lot of shooting, learned a lot, made a lot of mistakes and as I was heading back to the motel I noticed an old rusty car with a light in front of it. It looked interesting so I stopped and took a closer look. The light was one of those you stick in the ground and it uses a solar cell to charge during the day, turning on at night automatically. This light was just laying there under a piece of plastic pipe, not stuck in the ground as it normally would be. I thought about moving the light or covering it with a blanket but my test shot showed me something interesting; the light almost made it look like the headlights on the old car were on and shining on the ground.
I had already determined that I could shoot about 30 seconds without getting too much star trailing using my 10mm lens, D7000 camera at ISO 3200. Balancing the existing light and adding just the right amount of light painting with my headlamp on low to the passenger side of the car was the trick. After a few test shots to get the lighting right, and the focus (you have to manually focus for these types of shots) I was happy enough to start clicking off real frames. This was about the third try and as soon as I saw it on the screen I knew that I wasn’t going to get any better so I packed up an went in for the night.
The image you see above is completely unedited other than a crop and resize. In fact I have my camera set to take “RAW + JPG Basic” and this is the basic JPG file, not a RAW conversion. I can’t wait until I have time to work with the RAW file. This will probably be the first print I ever do as a 20″x24″ metal print. Note the colors in the sky, not just the single stars, but in the Milky Way. How about the amount of structure and detail? All of this without editing at all, amazingly dark skies!
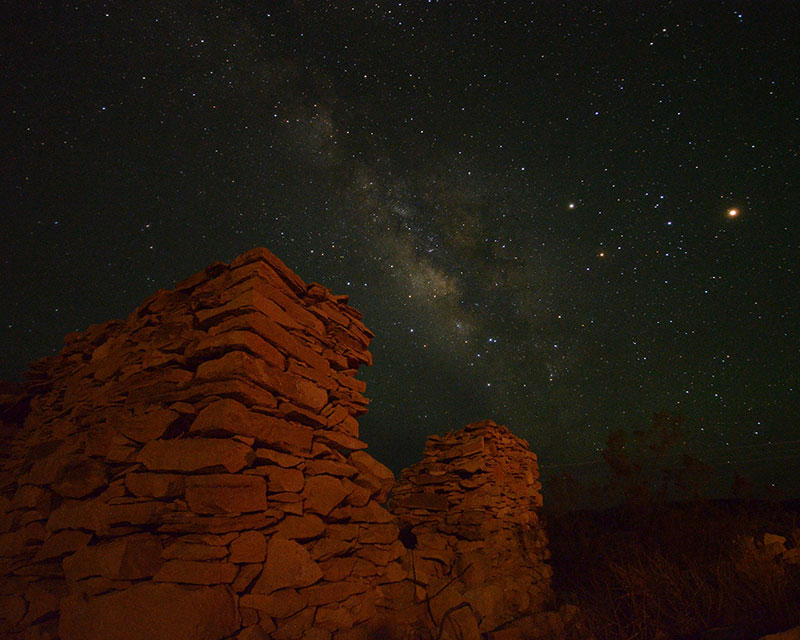
A shot from the second night out, unedited.
The second night out was just as amazing. I could walk out my brightly lit motel room, look up and almost immediately see the Milky Way even with a porch light three feet from my head on the right. Simply amazing. That really tells you how dark skies affect your vision of celestial objects.
The image above was taken next to the ruins of one of the miner’s homes from the late 1800s. I did not light paint this one as the red glow from a nearby cabin light gave it exactly the right amount of ambient light. This was another 30 second exposure at ISO 3200.
If you can do this with nothing but a tripod and consumer DSLR for the Milky Way, image what you can do with your astrophotography equipment and deep sky targets? I absolutely want to go back and see. Dark skies do make a huge difference.
If you want to see more images shot in these dark skies, and even some in daylight, I will soon be posting them on my photography website over at www.paperbirdimages.com so go take a look.
Share this post!