Monochrome vs OSC CCD cameras, which is right for you?

So you have decided to move up from a DSLR or other regular photography camera to a CCD but not face the question of which variety to get. You have heard about CCDs that are just like a DSLR in that they shoot a color image, while you have heard others shoot in monochrome and require color filters to get a color image. What to do?

Start by understanding that every camera records in monochrome, yes, even your DSLR and one shot color CCDs, and yes, even a film camera!

Above you see a representation of a Bayer matrix used in many one shot color CCDs. The gray squares are the actual sensors in the camera called photosites, each colored square (marked with a R for red, G for green and B for blue) is a filter on top of the photosite (note that all photosites are covered by colored filters, they are removed in this image for demonstration purposes). These are combined to form a single color in the camera so the output you see is in full color. Every four-pixel square (one red, one blue and two green because the human eye is most sensitive to green in normal daylight) is combined using a complex math formula to create one colored area with four pixels of detail.

You can manually do the exact same thing with a monochrome camera and three colored filters:

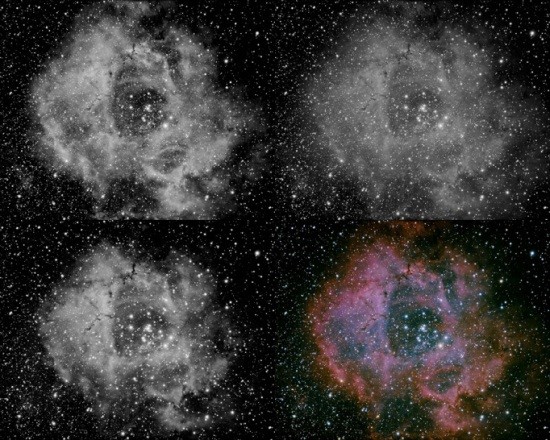
The four images above are the three color channels and then the final combined image. This is how monochrome imagers create color images, and of course, how your camera works. This is called RGB (easy!).

You do not necessarily have to shoot red, blue and green filters to use this function. This is also how people shoot “narrowband” using Ha, SII and OIII filters, among others. They use a monochrome camera (or in my hard headed case, a DSLR) and shoot one set using the Ha, one set using the SII and another set using the OIII filter and then combine them on the green, red and blue channels respectively (for “Hubble pallet” images). You can mix and match colors, shoot one through a regular colored filter, another through a narrowband filter, and a third through no filter at all, then combine them. You can even combine MORE than three colors by adding new channels! While there are no rules, I suggest you start with standard RGB and/or Hubble pallet narrowband to get a feel for things and then move on.

One reason all this is important is resolution. If you take a look back at the first figure this post you will notice that each photosite, or pixel, records one color. To make a real color image we just learned that you need three colors, red, blue and green. So how does that relate to resolution in the camera?

A color camera, CCD/DSLR/Point & Shoot all work the exact same way. The camera takes a square, one red pixel, one blue pixel and two green pixels and creates one color pixel from these. Basically this takes your 10MP camera and turns it into a 2.5MP camera (10 divided by 4) when it comes to colors, yet it retains the 10MP luminosity. Stripping away the techno-babble this means that your image has the black and white resolution of 10MP (luminosity) but the color resolution of 2.5MP. Said another way, it takes a 2.5MP color image and overlays that color (not the detail, just the colors) on top of a 10MP image.

I know this is a hard concept to visualize so let’s do one more analogy. Take two images, one 2.5MP in size and one 10MP in size. Convert the 10MP to grayscale (sometimes called black and white, but actually has all the gray shades as well) and print them out the same size, the 2.5MP on tracing paper in full color, the 10MP on regular paper in monochrome. Now overlay the 10MP with the 2.5MP and see the results. Note that the edges on the 2.5MP image will be very jagged compared to the 10MP so the color will not line up just right with all the edges. This will cause some blurring on the edges and your objects will not be nearly as sharp and well defined.

Enough with analogies, let’s see what that looks like:

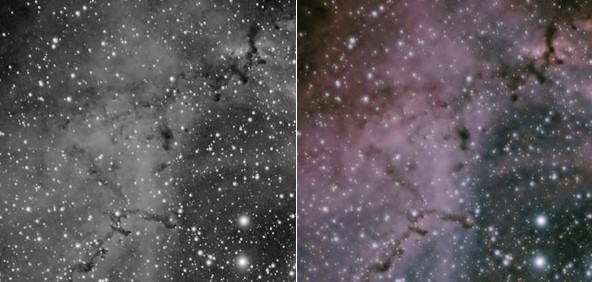
The image on the left is a 300 pixel wide crop of image NGC2244 in monochrome, the image on the right is a 75 pixel color crop stretched over the 300 pixel monochrome image with an opacity of 50%.

This fairly accurately simulates the difference between two cameras, one monochrome and one color, with the same megapixel sensor. Notice how much sharper and clearer the monochrome image is.

So what the heck does this mean? Simply stated this means that a monochrome camera will always have better detail than a color camera if they are both rated at the same number of pixels or resolution.

If it sounds like all the advantages are with the monochrome, you would not be far from the truth. You will always be able to get better images with a monochrome CCD, period. The advantage of a one shot color camera, and it is a big one, is time.

With a monochrome CCD if you want to capture a color image and you need about one hour of capture time, that means you need at least three and preferably four (red, blue, green, and luminance). This means four hours of capturing. If you want to do the same thing with a one shot color, one hour is all you need assuming it has the same sensitivity. For four hours that may not be that big of a deal, but some images I have are made up of twenty or more hours using a one shot color!

Now you can add to your shooting time, processing time. Images from a one shot color are generally faster to process because they are already combined into a color image. Monochrome images require you to combine and calibrate the images to create a color image you can then work with, the one shot color takes all of this work out of the equation. 

So it basically comes down to this; if you are short on time or want an easier time of it, get a one shot color CCD, if you have plenty of time and don’t mind working harder to get a superior image, go for the monochrome CCD.


Share this post! Facebooktwitterredditpinterestlinkedintumblrmail

Full well capacity and why does it matter?

What is full well capacity? The full well capacity of a camera (sometimes called pixel well depth or just well depth) is a measurement of the amount of light a photosite (the part of a sensor that collects the light for a single pixel on monochrome cameras or that is used as the luminance value for a single pixel on a color camera) can record before becoming saturated, that is no longer being able to collect any more.

Lets explain this a little more in depth before we move on. This subject can get a little overwhelming for those who are not familiar with the parts and terminology so I want to take things slow. We will start with a discussion of what a camera sensor is and how it works before we get into well depth or full well capacity.

The sensor in a digital camera is a collection of photosites arranged in a grid. These are sensors that measure the amount of light that strikes them. In simple terms, the more light that strikes the photosite, the higher the voltage, or longer the pulse width the photosite will output. The basic thing to remember is that more light means more response from the photosite.

At some point however the photosite becomes saturated, which means it has had all it can take. At this point you can continue applying light but the photosite will not register it any more. Think of this as charging a battery, once it is fully charged, continuing to charge it will not result in any additional capacity in the battery. The photosite has reached it’s full well capacity or it’s maximum well depth.

For monochrome cameras one photosite equals one pixel and you are done. For color cameras it is a little more complicated. Color cameras (called one shot color in astrophotography because you can shoot color with monochrome cameras by taking three images; one with a red filter, one with a green filter and one with a blue filter and then combining them) on the other hand use each photosite as a pixel’s luminance value (luminance is how bright a pixel is) and then take a group of four pixels covered by a Bayer matrix to show what a pixel’s color is.

Bayer matrix - full well capacity article

A representation of a Bayer matrix or Bayer filter

The Bayer matrix is a filter or set of filters that covers the photosites with colors, two green, one red and one blue for each block. It uses two greens because our site is predominately green so images should be as well. Each of the photosites in the block has its own luminance, but the colors from all four are mathematically calculated to give a color to each one.

This is why monochrome cameras that are 10MP are more accurate than color, because the 10MP cameras actually capture 10MP of data for both luminance and color (when shooting with red, green and blue filters) whereas a one shot color camera captures 10MP of luminance data and only 2.5MP of color data. The monochrome does require three times the number of images to make a color image however.

The capacity of the photosite to record light is called the full well capacity. The higher the full well capacity, the brighter the light you can record. You are probably wondering why we need to worry about bright lights and full well capacity if we are recording dim objects like nebulae? Glad you asked!

If all you cared about was the really dim nebula showing up in your image, full well capacity is not that important at all. Unfortunately the majority of time we have very bright objects (comparatively) in the image too, they are called stars. The brightness difference between the stars and the nebula is huge, so we need the capability to record both objects without the star appearing too bright or the nebula being too dim.

At this point you may say you don’t care about how bright the star appears, once it turns white on the image it is white and can’t get any whiter. This of course assumes you do not care about having star colors in your color image or are shooting monochrome. In those cases full well capacity would seem to matter less.

There is another problem that happens once the full well capacity is exceeded called bleed or bloat. Think about filling a glass with water. What happens when you overfill the glass? That’s right, it spills over on to the counter. The same thing happens with photosites in that the excess light can in effect (not literally) spill over or bleed over to the surrounding photosites. This causes the stars to bloat and seem to get larger.

We have all seen this in images. All stars are point objects, they appear as a single point of light. Sirius appears exactly the same size as Polaris, just much brighter. In many images however some stars appear much larger than others, this is where the full well capacity has been exceeded.

What is happening when you pass the full well capacity is the photosite is generating so much voltage that it is causing the photosites surrounding it to increase their voltage as well. This spreads the response out to multiple photosites which makes the star look larger than it should.

In astrophotography you want the black of space to be black, the star to be bright, colorful and appear as a point of light, and the nebula to appear bright and defined. The way this works is that we expose long enough to get the nebula to be nice and bright, while hopefully having enough well capacity to store all the light from the stars without exceeding the full well capacity and bleeding over.

The black of space is handled by the noise floor of the camera. This is outside the scope of this particular article but basically the lower the noise, the easier it is to capture smooth black space and separate that from the slightly less black nebula. The longer the exposure, the more light you get off the nebula without capturing anything from empty space. The noise floor is a mixture of several factors including things like camera read noise and shot noise.

So more exposure means more data from the nebula, but that can cause the stars to saturate the photosites exceeding their full well capacity. Where is the balance?

Setting your camera exposure is basically a matter of shooting as long as you can without exceeding the full well capacity of the sensor. If that does not give you enough exposure to capture any data from the nebula, then you will be forced to increase the exposure even while causing the stars to bloat.

This is why a higher full well capacity is something astrophotographers strive to have. Unfortunately cameras with a low noise floor, high resolution, and high full well capacity are very expensive. This is where the balance of money versus capabilities comes in. Get the best you can afford and do the best you can.

Remember when we discussed color cameras and the Bayer matrix? Remember it seemed a little out of place and not really relevant to the discussion? It was, and here is why it is important to full well capacity.

When shooting monochrome, since each photosite creates one pixel, bloating only really affects one thing, luminance. Color stands on its own because you are just measuring the luminance of that one photosite through a colored filter.

On the other hand, if a color camera has a photosite driven over its full well capacity, it too bleeds luminance data to the surrounding photosites, but the color data changes too. For example, if you measure the color using the scale of 0 being no light and 255 being full, and then the three colors being broken out as red, blue and green you come out with something that could look like 0-255-0 for an object that is pure blue.

If the star is a point light source and it is over a blue photosite on a one shot color camera, once the photosite reaches it’s full well capacity and a reading of 0-255-0 and then is still exposed to light it could spread to look more like 10-255-20 (remember there are two green to every one blue and one red). This can continue on to 100-255-200 and beyond. As you probably guessed this dramatically changes the color that is presented in the final image.

All of this so far has been theoretical as real life presents unique challenges. For example a star is never a point light source on Earth. Even on the highest mountains in the clearest weather there is always pollution, water vapor and more in the atmosphere distorting your vision. This makes it appear as if Sirius is indeed larger than Polaris. If you were in orbit, you would have a much harder time seeing a size difference between the two.

So is this all academic? Not really, we still strive for smaller colored stars, brighter nebula and blacker smoother space. The full well capacity of your camera is how you get there.

You can read a lot more information on well depth including full well capacity and other aspects of CCD cameras on Wikipedia.

I hope you enjoyed my article on full well capacity and well depth!


Share this post! Facebooktwitterredditpinterestlinkedintumblrmail