New raw data added to Long Exposure Astrophotography page!

A while back, a customer who goes by Brucer on Amazon, suggested I add more data to the web page for Long Exposure Astrophotography so people who bought the book would have more astrophotography data to practice with. I thought that was an excellent idea but was crazy busy at the times.

I have found some time to add a little to the website so I am please to announce I have uploaded additional astrophotography data including lights, darks and bias files that I used to process my images of M16 the Eagle Nebula, M22 cluster, IC281 the Pac Man nebula, and NGC6992 the Eastern Veil Nebula.

New astrophotography data added to the Long Exposure Astrophotography book page

These are the exact same raw files I used so you can see the end results I came up with on my website. That gives you something to shoot for!

Although I can not always fulfill every request, I really love it when people give me suggestions to help other readers learn astrophotography and I do what I can. If you have any ideas, suggestions or requests, please do not hesitate to use the contact form or drop by the forums and let me know.

Clear skies!

Allan

Enjoy the new astrophotography data!


Share this post! Facebooktwitterredditpinterestlinkedintumblrmail

New book on taking pictures of eclipses released!

How to Take Pictures of an Eclipse front cover How to Take Pictures of an Eclipse back cover


Do you want to learn how to take photographs of an exciting Solar or Lunar Eclipse? Do you have the right equipment for the job? Do you want to know ALL the tips and techniques needed to make this a success?

A total Solar Eclipse is an incredible sight to behold. It is one of nature’s most awe-inspiring events and has been the subject of amazement, wonder and fear throughout the ages.

But they don’t come around very often. In fact, the last total solar eclipse in North America was 40 years ago. In 2017, however, you will have another chance to witness this rare phenomenon as another total solar eclipse will occur on the 21st August. The total solar eclipse 2017 is something to not be missed!

Now, with How to Take Pictures of an Eclipse, you can be prepared to capture this unique moment as well as other solar and lunar eclipses with information on:

¬Safety warnings
¬The basics you’ll need to know
¬Getting the images you really want
¬What sort of camera to use
¬Using a telescope
¬Motorized mounts
¬And much more…

Capturing this amazing, once-in-a-generation event is something that you won’t want to miss out on and capturing the best shots of it is crucial when it comes to the bragging rights.

Now is the time to act if you want to be prepared for this spectacular sight. Get your copy of How to Take Pictures of an Eclipse now and make sure that you are ready to get the photographs that will amaze your friends and family and be the envy of all.

Get your copy in either print or Kindle edition and be ready for the eclipse today!


Share this post! Facebooktwitterredditpinterestlinkedintumblrmail

Astrophotography tutorials, reviews, and more on YouTube.

I have had a YouTube channel for a long time but never really developed it until recently. Now I have started putting up astrophotography tutorials, astrophotography videos, reviews, and much more at a breakneck pace mainly aimed at astrophotography for beginners. Just last weekend I put around five videos up with several more in process.

Astrophotography tutorials, reviews, and more on my YouTube channel

Just this weekend I added the following videos:

I have also redone several of the existing astrophotography videos to bring them up to HD (1920 x 1080 @ 30fps) so they look better.

If you have a astrophotography tutorial or video topic you would like for me to cover, use the contact form to let me know. I will be covering anything and everything I can come up with for a while to help build the channel. If you are interested in contributing videos to the channel, let me know as well.

Most of the videos there, and the ones I have planned are designed for the astrophotography beginner. Many were originally designed to augment my books which include several that are a beginner’s guide to dslr astrophotography. If you have ever wanted to know how to take pictures of the night sky, drop by and take a look at some great astrophotography videos.

Be sure to subscribe to my astrophotography videos channel!


Share this post! Facebooktwitterredditpinterestlinkedintumblrmail

Brightest supermoon in seventy years

Last night was the brightest supermoon in seventy years, or so they say. Unfortunately I was not doing anything special for the occasion although I did get to spend a few minutes out at the observatory and took a few pictures.

So what exactly is a supermoon? Let’s start answering that question with the fact that the moon’s orbit around the earth is not a perfect circle but more of an ellipse. At times that means the moon is closer to the earth than at other times. A supermoon is when you have a full (or new although you can’t really see it then) moon at the same time as the moon is at it’s closest point in it’s orbit of the Earth.

Put a little simpler, it is when the moon is full and close at the same time.

What this means to us astronomers and astrophotographers is that the moon appears bigger and brighter than at any other time.

Supermoon rising over the observatory domeThis image is the moon rising above the observatory dome. Unfortunately unless you are familiar with the SHSU observatory and what the moon typically looks like out there, you may not see that this does indeed look pretty big. It was an impressive sight.

This next picture should get your attention however:

Supermoon backlighting the observatory domeMost people would guess that this is the observatory dome right before sunrise, or sunset. They would be wrong. This was taken at 7:09pm CST facing east (the sun sets in the west, so behind me, not behind the dome). The light you see is the moon about 20 degrees or so above the horizon.

Yes, it was that bright. How bright? Reading a printed book with nothing but moonlight was not only possible, but quite easy.

When is the next supermoon?

If you missed it never fear, the next supermoon is scheduled to appear on December 3rd, 2017. It will not be quite as spectacular as this one however. If you want something this amazing you will have to wait until November 25th, 2034!

Until the next supermoon, Clear skies!


Share this post! Facebooktwitterredditpinterestlinkedintumblrmail

How much do dark skies really matter?

If you are even a little into astronomy or astrophotography you will hear people extol the virtues of “really dark skies”, but do dark skies really make that much of a difference? The short answer is yes, dark skies are crucial, what follows is a somewhat longer answer 🙂

Dark skies are rare in the US

Dark skies map of the US

I planned a trip from where I live in Huntsville to a little town in south west Texas named Terlingua. Terlingua is pretty much right in between Big Bend Ranch State Park and Big Bend National Park just a few miles from the border with Mexico. It is home to a real 1800s mining ghost town and 58 residents as of the last census. That is not an error, fifty eight people live there. There isn’t even a gas station in town, you have to drive five miles up the road to Study Butte for that and you better do it before 9PM or they will be closed. This area is home to some of the darkest dark skies in the nation as you can see from the dark sky map above. This is one of the few places with no light pollution in the Texas.

I picked Terlingua because I had seen some amazing pictures from photographer Lance Keimig from this area which I wanted to try my hand at. His night photography with light painting (where you add light to an object in the scene and have that mix with the natural light, such as from the stars or moon) was just fascinating. There was just no way I could do that kind of work with the light pollution around here, much less without that kind of cool scenery.

In picking the date I needed to maximize the dark skies and that meant a new moon, the Milky Way up somewhere in the middle of the night, good weather and if I could get other objects in the picture as well, that would be a bonus. The first weekend in June looked good as it had the new moon, the Milky Way would be up high at about 1am, and both Mars and Saturn would be close enough to the Milky Way to be in the shot. The weather, as anyone from Texas will tell you, could be anything.

The ten hour drive was typical until we passed Austin a hundred miles or so when things began to change. Trees started to get much smaller, grass started to disappear, larger and larger hills appeared and everything started to get rocky and sandy. Slowly cacti stated to replace shrubs in popularity.

We arrived on a Friday afternoon, checked into our motel, ate dinner in the motel’s restaurant (where they had amazing Mexican food cooked by a guy from Ireland) and took a little driving tour of the ghost town (which we were less than a quarter mile from down the road the motel was on) to find suitable places to shoot from. Finally we took a nap. Getting up at midnight would have been hard any other time but I was truly excited to try my hand at this. I had never been in these kinds of dark skies, rarely shot anything at night other than astrophotography, have never tried light painting, and had never gotten anything resembling a good Milky Way shot.

Picture showing dark skies over Terlingua

One of my shots the first night out, cropped but otherwise the JPG right out of the camera.

That first night I did a lot of shooting, learned a lot, made a lot of mistakes and as I was heading back to the motel I noticed an old rusty car with a light in front of it. It looked interesting so I stopped and took a closer look. The light was one of those you stick in the ground and it uses a solar cell to charge during the day, turning on at night automatically. This light was just laying there under a piece of plastic pipe, not stuck in the ground as it normally would be. I thought about moving the light or covering it with a blanket but my test shot showed me something interesting; the light almost made it look like the headlights on the old car were on and shining on the ground.

I had already determined that I could shoot about 30 seconds without getting too much star trailing using my 10mm lens, D7000 camera at ISO 3200. Balancing the existing light and adding just the right amount of light painting with my headlamp on low to the passenger side of the car was the trick. After a few test shots to get the lighting right, and the focus (you have to manually focus for these types of shots) I was happy enough to start clicking off real frames. This was about the third try and as soon as I saw it on the screen I knew that I wasn’t going to get any better so I packed up an went in for the night.

The image you see above is completely unedited other than a crop and resize. In fact I have my camera set to take “RAW + JPG Basic” and this is the basic JPG file, not a RAW conversion. I can’t wait until I have time to work with the RAW file. This will probably be the first print I ever do as a 20″x24″ metal print. Note the colors in the sky, not just the single stars, but in the Milky Way. How about the amount of structure and detail? All of this without editing at all, amazingly dark skies!

terlingua02

A shot from the second night out, unedited.

The second night out was just as amazing. I could walk out my brightly lit motel room, look up and almost immediately see the Milky Way even with a porch light three feet from my head on the right. Simply amazing. That really tells you how dark skies affect your vision of celestial objects.

The image above was taken next to the ruins of one of the miner’s homes from the late 1800s. I did not light paint this one as the red glow from a nearby cabin light gave it exactly the right amount of ambient light. This was another 30 second exposure at ISO 3200.

If you can do this with nothing but a tripod and consumer DSLR for the Milky Way, image what you can do with your astrophotography equipment and deep sky targets? I absolutely want to go back and see. Dark skies do make a huge difference.

If you want to see more images shot in these dark skies, and even some in daylight, I will soon be posting them on my photography website over at www.paperbirdimages.com so go take a look.


Share this post! Facebooktwitterredditpinterestlinkedintumblrmail

Pixel size, sensor size and more

Pixel size, sensor size and many other factors seem to complicate our choices for cameras these days. Just when you thought cameras could not get any more complex with ISO range, well depth, and active/passive cooling I’m here to throw another wrench or several into the mix.

Lets start with pixel size or pixel measurement which should really be called photosite size. The actual sensor on a digital camera is made up of light detectors called photosites. These photosites are what create the pixels in the image. Each photosite measures the light hitting that sensor and generates a signal in proportion to the amount of light hitting it that is sent to the processor inside your camera.

photosite size comparison

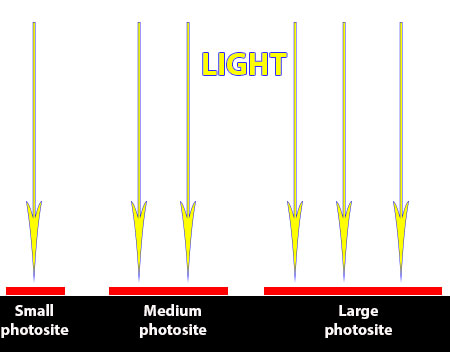
fig 1: Illustration of how photosite size affects light collecting ability

As a general rule, the larger the photosite size the more light it can gather simply because the larger area will be struck by more photons. More light striking the sensor means a higher signal output by each photosite. This in turn means it will require less amplification (a lower ISO) to achieve the same results as a camera with smaller photosites. You could also say that at the same ISO the camera with the larger photosites could use a faster exposure.

Since you can collect more light with a larger photosite size that also means that you have a higher signal to noise ratio (SNR). This is particularly important in astrophotography because we are always shooting an extremely dark object (nebula etc) against a totally dark background (black of space). Since there is so little contrast or difference between the object and the background, it is important to have the highest SNR possible. The reasoning is that when there is a lot of noise, it is much more difficult to extract the signal.

Think of it as audio. When you are at a live concert the band is the noise, then you try to talk to the person next to you which is the signal. This is very difficult to do at a heavy metal concert (high noise) but far easier at a concert featuring an unplugged classical guitarist (low noise). Since in astrophotgraphy you are always shooting long exposures (compared to normal daylight photography) and using high ISO values when you can, there is a lot of noise injected into the images.

A larger photosite size will have lower noise primarily because the accuracy of the measurement from a light sensor is proportional to the amount of light it collects. In other words, if a sensor collects one photon over a one second exposure it will be dramatically less accurate than if it collects one hundred photons. This occurs because every photosite has an amount of noise that happens when the sensor is read (read noise) and a certain about of noise per exposure (shot noise). This amount of noise does not substantially change from a one second exposure to a two second exposure whereas the number of photos captured doubles. More photons collected means a lower amount of noise in relation to the number of photons.

Now to be technically correct, the amount of noise does change as the exposure time changes, but it does so far less than the increase in the number of photons collected. In fact, the signal is the squared amount of noise, or the noise is the square root of the signal, whichever is easier for you to remember. If the signal is 900 photons, then the noise is 30 which gives you a SNR of 30. Double the incoming light to get 1800 photons and you get a noise of roughly 42.5 and a SNR of about 42.5. As you doubled the light collected in this example, you increased the SNR which made it easier for you to pull really dark objects out of the muck.

The next effect of a larger photosite is in dynamic range. A dynamic range is basically the amount of difference between the darkest a sensor can record and the lightest. In a previous article I discussed full well depth as being the maximum amount of light a photosite can store and that is an important player in dynamic range.

dr6

fig 2: A six part gray scale representing a low dynamic range

In figure 2 above the numbers across the top represent percentages of saturation of a photosite. Since this has such a small dynamic range everything from about 19% through 33% all reads as the same color. This is not what you want in astrophotography where the nebula is almost as dark as empty space.

dr12

fig 3: A twelve part gray scale representing a low dynamic range

In figure 3 we see that there is far more definition so there are two different shades for objects in the same range of 19% through 33%. The higher the number of shades on this chart, the higher the dynamic range. More dynamic range makes it easier to separate nebulas and empty space.

Two primary things affect dynamic range, the ISO and the well depth. Since a larger photosite size or larger sensor size typically has higher full well capacities and also require lower ISO values for a given exposure, they tend to have far superior dynamic ranges.

snr-d7000

fig 4: Dynamic range and SNR by ISO for a Nikon D7000 DSLR

In figure 4 we see how the dynamic range (DR) and SNR both drop as the ISO increases. The D7000 camera used above is what is typically called a crop sensor (APS C sensor size) camera which typically has substantially smaller photosites compared to a full frame sensor camera. To get a general idea you could say that the dynamic range of a crop sensor camera at ISO 800 is 10.75 and for a full frame camera is 11.75 at the same ISO. While this is a massive generalization (and really wrong 99.9% of the time) it does give you the right idea.

This sounds great! Are there any down sides? Maybe.

One argument for smaller photosites is that they capture more detail. This stands to reason since the same amount of light would be spread across more photosites on a smaller sensor and therefor more pixels. It would simply be a matter of more pixels in the same image meaning more detail. True enough.

The opposing view is that in most cases people do very little enlargement by cropping an existing photo. This means that a photo taken with a 20MP (mega pixel or million pixel) full frame camera would have the same detail as a photo taken with a 20MP crop sensor camera. Also true.

Another concern is that crop sensor cameras have a crop factor built in. This means if you shoot a full frame image with a 50mm lens and then put that same lens on a crop sensor camera what you wind up with is the photograph looking like it was shot with up to a 75mm lens. This is because the lens puts the same size projection of light at the sensor plane (where the sensor is) and if you have a smaller sensor, less of the image appears on that sensor. This makes the image appear to be zoomed in.

While the image being zoomed in has no real bearing on the image quality, it can really throw a wrench into things when you bolt that camera onto a telescope. An object that fit perfectly on your full frame camera’s sensor now spills over the edges on the new crop sensor camera you just bought.

The last and probably most important factor is that a larger photosite size or a larger sensor size typically cost more money. This money could be spent getting something with a better cooling system or some other feature. Only you can decide where to spend your finite resources and which features are more important than others.

 So what does sensor size have to do with anything other than maybe having a crop factor? A larger sensor simply has more room for larger photosites, or a higher number of smaller ones as compared to smaller sensors.

I hope you enjoyed my article on pixel size and sensor size!


Share this post! Facebooktwitterredditpinterestlinkedintumblrmail

Five planets in the morning sky

This morning I viewed five planets aligned and the moon in the morning sky. It was a simply amazing sight. I had to get up really early in the morning to get out to the dark site so that I could spend a little time imaging, and a lot of time just admiring the view, and still go to work the next morning.

Five planets in the sky

Screenshot from Stellarium showing the position of the five planets at approximately the time I was viewing them

The five planets that were visible were Mercury, Venus, the Moon (yes, not a planet, but still a wonderful addition to this lineup), Saturn, Mars and Jupiter in that order from west to east along the ecliptic. What you don’t hear about is that Pluto is actually there as well just to the left of Venus on the screenshot above. I was not into astronomy the last time there was a five planet alignment back in late 2004 and early 2005 and it was a little different with the order of Mercury, Venus, Mars, Jupiter and then Saturn. Depending on when you observed back then you could get the moon in there as well. I was not about to miss the 2016 planet alignment!

Three of the objects in the sky

The moon, Venus and Mercury on the morning of the 5th.

It was a cold morning, just below freezing when I arrived at the dark site. The air was calm and clear. Once I set up my equipment and let my eyes adjust to the darkness the planets just jumped out of the sky. The moon, Arcturus and Vega also begged for attention. Even with five planets in the sky the real action for me was in the rising Sagittarius which contained Mercury, Venus and the moon.

I had of course seen all of these five planets before, but only once for Mercury, and I had never imaged it. It is far too small and bright for my equipment to do anything but render Mercury as a bright point of light just like Vega, but in a wider field with its neighbor, it was spectacular.

Venus is the most difficult I have imaged before, and for my equipment I think I have a pretty amazing image. After many sessions, tons of attempts, and more hours than I care to admit I finally got an image of Venus which showed something besides a bright dot. In the image below you can clearly see the shading on the clouds that cover the planet, amazing.

Venus

My attempt at Venus, click to enlarge and see the cloud shading

This image required the use of a video camera instead of my typical DSLR or CCD cameras. Stacking hundred is images is the only way I could get something this clear of something this small. Even with this setup, Mercury is far too small to pull this off.

Mercury is the most difficult of these five planets to image and my next chance to image it with any real meaning will be the transit on May 9th, 2016. May is a terrible weather month but I will be keeping my fingers crossed. I got lucky enough with the Venus transit so I guess it could happen again.

I hope you enjoyed my article on the five planets!


Share this post! Facebooktwitterredditpinterestlinkedintumblrmail