Andromeda galaxy revisited

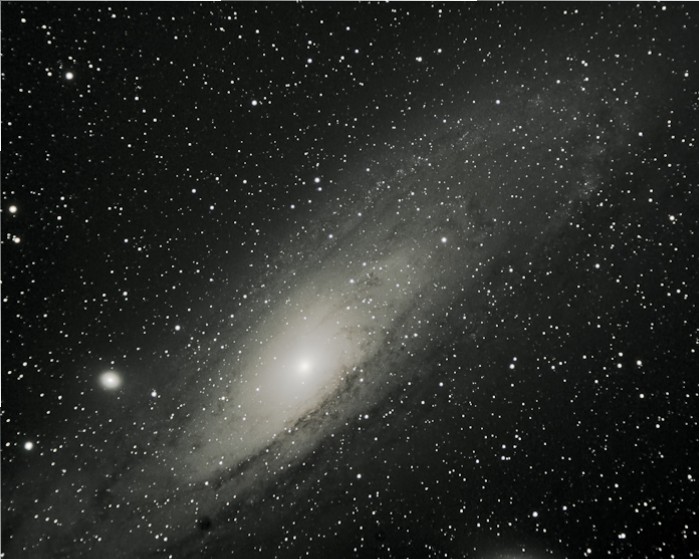
Back on September 21st of last year my first ever DSO (Deep Space Object) was Messier 31 (M31 for short), the Andromeda Galaxy. This is a common target along with the Orion Nebula for newcomers to astrophotography because it can be captured relatively well without spending all night and locating the Andromeda Galaxy is fairly easy. I thought it was about time I revisited that target and see what kind of improvement I could muster up after four months of work. Here is the image I captured on January 13th of this year:
The Andromeda GalaxyHere is the Andromeda Galaxy image from September 21st of last year for comparison:

Andromeda Galaxy old

Much better! I still have issues to work out but the amount of data, quality of the image and colors are far superior to my previous attempt. The blue on the lower left is particularlly pleasing as I have seen that in images of the M31 Galaxy and wondered why I can’t seem to capture it. I attribute the improvement to things like more light frames taken, more dark frames taken, much better focus, using a field flattener, better skyglow filter and of course, better technique.

With the exception of the field flattener and new skyglow filter all the equipment was the same, as was the software used. The new image was 20 lights of 300 seconds each at ISO800. I stacked those lights with 10 darks for the final image. It is taking me a while to get the correct length of exposure and ISO to minimize noise while making sure I have enough signal to stack and stretch. I think I am going in the right direction.

My setup provides a little too much magnification to get everything in the frame which is a shame. Maybe if I ever switch to a full frame camera or CCD I can get the entire Andromeda Galaxy in the image. Even so, not too bad.

I hope you enjoyed my images of the Andromeda Galaxy!


Share this post! Facebooktwitterredditpinterestlinkedintumblrmail

M42 The Orion Nebula, revisited

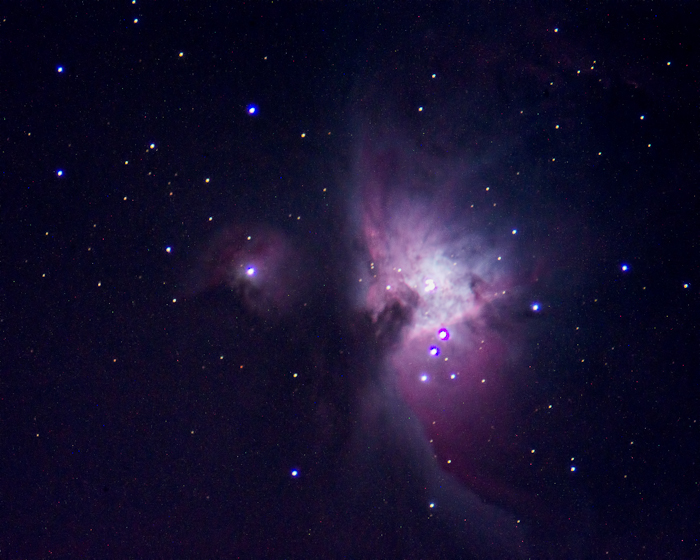
If you have been reading since the beginning you know that my second target for AP, and really more of an afterthought at the time, was the Orion Nebula M42. I was not at all pleased with the image, too many problems to really even get started. Now, a few months later, I had some ideas on how to correct some of those issues.

M42 the Orion NebulaHere is my original image of the Orion Nebula for comparison:

Original image of Orion

  A little better image of M42 don’t you think? I started off with of course better focus, then added better tracking, and lastly applied a little of my daytime photography knowledge and tricks to it making an HDR image to deal with the really bright core vs very dim outer dust lanes.

In this one image are stacks of 5 second, 10 second, 15 seconds, 30 seconds, 45 seconds, 60 seconds, 120 seconds and finally 180 seconds images. Each stack is then combined using HDR Efex pro to create the composite and then stretched in Photoshop. That’s 90 lights, 20 darks and 20 bias all combined into this one image. Funny thing is Messier 42 is one of the brightest objects in the sky and can clearly be seen with the naked eye as a fuzzy patch in the sky at below Orion’s belt. Yet even for being this bright it is the hardest object I have shot to date with all this combining and processing.

If you want a little more comparison, check out the Messier 42 image shot by the Hubble Space Telescope. Obviously mine don’t even hold a candle to what the Hubble can do but it is very interesting to see the same details in both images and realize I gathered much of the same data with amateur gear. That is simply amazing. It also really makes me strive to see what else I can accomplish.

Thanks for looking at my Orion Nebula images!


Share this post! Facebooktwitterredditpinterestlinkedintumblrmail

Solar imaging first attempt

Solar imaging solves the problem of always being asleep during the day and imaging at night (what AP guy actually has a day job? heh). I wanted to play around a little with solar and see if I liked it. If I do, of course there are dedicated Ha and Ck solar telescopes which are fairly expensive that I can use to do some pretty impressive solar work. For now though, I purchased a Thousand Oakes full aperture glass solar filter for my main scope to see what it could do and here is my first attempt at solar imaging:

Solar imaging   But just an image is not enough, I need to learn something:

annotated solar imaging So off I go researching sunspots, they have numbers you know 🙂 Not only is solar imaging fun and a great way to use your equipment during the day, but it also can help you learn more about the stars. When you are imaging thousands of stars at night it is hard to think about what all is happening on the surface of each star. With solar imaging you can watch the sunspots move across the face and know that the sun is just as much a living thing as you are.

It also makes a fantastic outreach tool as sometimes it is difficult to get people together after dark, particularly children and their parents. If you want a great use of this for outreach, any DSLR with live view becomes and excellent real time solar image capture device which can easily be put on a computer screen. You can also use any video camera you can attach to a eyepiece or telescope as solar imaging cameras.

I simply bought a nice glass solar filter for my primary imaging system and added some solar observing glasses to create an excellent solar photography kit.

Hope you enjoyed my first attempt at solar imaging!


Share this post! Facebooktwitterredditpinterestlinkedintumblrmail

Andromeda Galaxy, M31, First Deep Space Object

Here is the Andromeda Galaxy (M31 Galaxy) and that makes it official, after a couple more orders from Orion to get things I didn’t think of the first time, and a lot of time practicing with the scope and connecting it all to a new netbook, I am an astrophotographer (albeit a pretty crummy one, heh). Crummy or not, I am really excited to be able to create images of these beautiful objects millions of light years away. Without further ado, here is Messier 31:

Stretched image of the Andromeda Galaxy   It takes an amazing amount of work to get one image. My first few images on the blog (the moon with my 114EQ and Jupiter with this scope) were both single images (OK, Jupiter was two single images sandwiched together). This one is a whole slew of images combined in a special piece of software called Deep Sky Stacker with other images called darks which are taken with the lens cap on. All of those are combined and then the resultant image is put into Photoshop and “stretched” by using levels and curves to get the result you see above. Hours and hours of work to get this one little image. Man, glad I didn’t know all this before I bought the scope, I may have hesitated! Here is what the image of the Andromeda Galaxy looks like before all the stretching:

Unstretched M31   Amazing, right? I also had a chance to do the Orion nebula too, here is my shot from it:

Orion nebula Not too bad I guess but it has a lot of issues. Since I was mainly concentrating on the Andromeda galaxy I was not to worried about how this turned out, I am very sure I will be shooting Orion many more times in the future.

I hope you enjoyed my first DSO images including the Andromeda Galaxy!


Share this post! Facebooktwitterredditpinterestlinkedintumblrmail

First light

First light it seems is the term used to describe when your telescope gets to go out and be used for its intended purpose for the very first time. A few days ago I received a bunch of boxes from Orion and quickly set about assembling things. I did have to make one phone call, read a bunch of directions and play with things a while but I finally got things running where I think they should be.

I Joined the North Houston Astronomy Club (they have a dark site in Montgomery and somehow are tied to SHSU’s observatory here in town, have to figure that one out later) and was headed down to their dark site when it hit me, I have no chair to sit on and nowhere to put my star charts, binoculars, drink, nothing! Fortunately I was passing an Academy sporting goods store so I stopped in to grab some essentials.

Once at the dark site I set up and waited for the sun to set:

Orion was correct, the views through this scope were nothing short of amazing and breathtaking. I got to see Jupiter, the Ring nebula and the Dumbbell nebula. I could clearly see the bands on Jupiter! In addition the Ring was bright blue and the Dumbbell was a pale blue, almost aqua. I had repeatedly been told you couldn’t see colors, they lied.

Since I bought this setup for astrophotography it seemed only fitting I try to take a picture so I attached my camera to the adapters and shoved that in the focuser to get some images. I combined two of them (one for the planet, one for its moons) and here is the result:


Amazing! Yeah, its a crummy picture, but for my first night out with no practice and no help really, it is amazing.

Special thanks to the NHAC members who were there and helped me find alignment stars, and even let me look through a Nagler eyepiece! Better than my Stratus eyepieces? Yes! $700 better? Nope, not even close. In fact, the guy with the Nagler seemed pretty impressed with my Stratus eyepieces, pretty dang good for the money.

What a night!


Share this post! Facebooktwitterredditpinterestlinkedintumblrmail

Beginning astronomy, and astrophotography

Whether you are beginning astronomy, beginning astrophotography, or both, you will sympathize with much of this. We all seem to start in a very similar way and this is my story.

My fascination with all of this started as a kid, as I am sure it did with most people. Since I was born around the time of the great race to the moon it was only logical that I was star struck (pun intended) with everything space related. In that time it was hard not to be. Model rockets were all the rage, and everything was advertised in some way with astronauts and space related themes. I don’t think it is possible that anyone will ever be brought up in such a space nurturing environment.

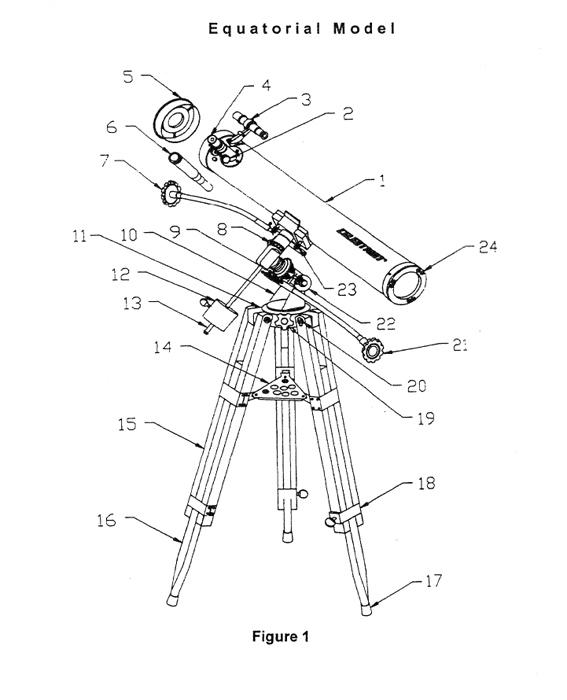
Fast forward to where I got my first “real” job, which I define as a job that not only pays the bills fairly well, but allows for enough extra cash to blow on not-so-cheap hobbies. I was really into photography so I had several camera bodies and a few lenses and I thought wouldn’t it be great to join that with my love of the stars? After much reading and many phone calls (this is pre-internet mainia so no web surfing involved) I bought what at the time (1996 or so) was supposed to be an awesome telescope for beginning astronomy and had some accessories. It was a Celestron 114EQ reflector like this diagram:

my beginning astronomy, a celestron EQ telescope Man how I hated this scope! Keep in mind I was a complete novice to this hobby, with no help, no clubs, and no internet to speak of. Rereading the manual over and over, and many phone calls to the store where I mail ordered the scope got me virtually nowhere.

I really wanted to like the scope as it cost me a small fortune and had me thinking of what all was possible. Unfortunately, despite what the salesman said, this was not a good telescope for beginning astronomy and even less so for beginning astrophotography.

I did however take one picture:

my beginning astrophotography, the moonThere were other pictures of course, but this was the best of the bunch, completely unedited (except scanning in the original 35mm negative, and resizing) just as it appeared on the print I had made. Obviously this was not the best beginner telescope for astrophotography. This scope probably spent a grand total of three hours outside spanning three occasions and was then turned into a living room decoration for the next fifteen or so years. I eventually resold it to a friend for his three young children who were getting started in astronomy. Since it had been so little used it was still in awesome condition and you could not buy a new one with the nice wooden legs anymore. I think his kids will enjoy it way more than I did.

I hope you enjoyed my beginning astronomy story!


Share this post! Facebooktwitterredditpinterestlinkedintumblrmail