Supernova SN2012aw in M95 galaxy

Supernova SN2012aw was one of those times where you just get lucky. I was fortunate enough to image M95 on February 25th and just discovered there was a supernova in the very outer lanes of that galaxy so I imaged it again, the supernova is clearly visible. This was probably one of the closest supernova to Earth in the history of humans.

Supernova SN2012aw   Almost exactly a month apart and the difference is obvious. One interesting thing to put this into perspective is that this did not happen in March 2013, in fact, not in this year, not in this century, and indeed, it happened some 38 million years ago. The distance of M95 is approximately 38 million light years away. This means somewhere between the extinction of the dinosaurs and the evolution of the Homo species is when the event happened but the light from it is just now reaching the Earth. Really makes you think.

The other amazing thing to me is how obvious it really is. You hear about how bright and violent a supernova explosion is but it takes something like this to really show you. That little dot is not much larger than any of the other stars in the image, except the other stars are not in that galaxy. If you look close at the galaxy and see the hazy dust that forms it’s structure, that dust is millions of stars. One of those little particles of dust way out on the edge of the galaxy exploded with such force that it is as bright as the central core of the galaxy it is in. Wow.

The magnitude of this supernova was around 13 when this image was shot.

Hopefully there weren’t any life supporting planets anywhere in that area! There is a fantastic little article on this spectacular supernova in the M95 galaxy on National Geographic’s website.

I hope you enjoyed my image of SN2012aw!


Share this post! Facebooktwitterredditpinterestlinkedintumblrmail

Comet Gerradd C/2009 P1, My first comet

Comet Gerradd was discovered by G. J. Gerradd on August 13, 2009 in Australia’s Siding Spring Observatory.You can find out more about C2009 p1‘s creator on Wikipedia.

Here you see the comet visually near the galaxy NGC 6015 (upper right corner) in the constellation of Draco. Notice that the comet sports two tails, this is because the gas that vaporizes off the comet due to the sun’s heating is being blown by the solar wind in one direction while the particles of debris and dust fall off in a different direction since they are not affected by the solar winds as much.

In the main image the comet is about as close to earth as it was going to get and is well inside the orbital distance of Jupiter, about half way between that distance and the orbit of Mars, sitting above the orbital plane of the planets. The smaller images show comet Gerradd moving across the frame in its travels across the sky.Image of Comet Gerradd  As you can tell I imaged comet Gerradd for over an hour. It was also a wonderful comet to view with binoculars. There were several of us out that night and I was certainly not the only one imaging the comet.

I hope you enjoyed Comet Gerradd!


Share this post! Facebooktwitterredditpinterestlinkedintumblrmail

Ha with an unmodded DSLR, pushing the limits

Read online and you will hear how you can not shoot ha with a DSLR, specifically DSOs that contain Ha with an unmodded DSLR (one that has had it’s IR filter removed) because the current line of DSLRs are not sensitive to the Hydrogen Alpha part of the spectrum. Rubbish. Sure modded cameras are more sensitive, but that doesn’t mean you “can’t” shoot Ha with a DSLR that hasn’t been modded, you just have to use the “right” camera and be prepared for some really long exposures. Below is NGC1931 bottom center and IC417 in the upper left, the Spider and the Fly:

Spider and fly in Ha with an unmodded DSLR, hydrogen alpha with a DSLR

This is shot with my Nikon D7000 of course, using a Baader 2″ 7nm Hydrogen Alpha filter, 20 25minute ISO 1600 exposures. That’s right, 20 exposures of 25 minutes each. I think I threw out one, maybe two frames because something happened. This Sirius mount just rocks.

Can you shoot a “better” image with a modded or monochrome camera? Absolutely! But you certainly can shoot hydrogen alpha with a DSLR or even full narrowband with a DSLR that has not been modded. The filter that they talk about is on the front of the sensor in the camera and reduces light at the wavelength of hydrogen alpha by sixty to seventy five percent. While this certainly makes for long exposures and introduces a lot of chances for things to go wrong, it does not eliminate your ability to capture ha with a DSLR. In fact, virtually all red nebulous regions in astrophotography taken with a DSLR are hydrogen alpha areas that are showing up even without modding.

In addition the manufacturer of camera is really not an issue. This image was shot with a Nikon SLR digital camera, but you could just as easily have used a Sony digital SLR or Canon.

If you would like more information here is an excellent, albeit long article on shooting IR and hydrogen alpha with a DSLR including camera modification.

I hope you enjoy my Ha with an unmodded DSLR article and HA with a DSLR image!


Share this post! Facebooktwitterredditpinterestlinkedintumblrmail

Andromeda galaxy revisited

Back on September 21st of last year my first ever DSO (Deep Space Object) was Messier 31 (M31 for short), the Andromeda Galaxy. This is a common target along with the Orion Nebula for newcomers to astrophotography because it can be captured relatively well without spending all night and locating the Andromeda Galaxy is fairly easy. I thought it was about time I revisited that target and see what kind of improvement I could muster up after four months of work. Here is the image I captured on January 13th of this year:

The Andromeda GalaxyHere is the Andromeda Galaxy image from September 21st of last year for comparison:

Andromeda Galaxy old

Much better! I still have issues to work out but the amount of data, quality of the image and colors are far superior to my previous attempt. The blue on the lower left is particularlly pleasing as I have seen that in images of the M31 Galaxy and wondered why I can’t seem to capture it. I attribute the improvement to things like more light frames taken, more dark frames taken, much better focus, using a field flattener, better skyglow filter and of course, better technique.

With the exception of the field flattener and new skyglow filter all the equipment was the same, as was the software used. The new image was 20 lights of 300 seconds each at ISO800. I stacked those lights with 10 darks for the final image. It is taking me a while to get the correct length of exposure and ISO to minimize noise while making sure I have enough signal to stack and stretch. I think I am going in the right direction.

My setup provides a little too much magnification to get everything in the frame which is a shame. Maybe if I ever switch to a full frame camera or CCD I can get the entire Andromeda Galaxy in the image. Even so, not too bad.

I hope you enjoyed my images of the Andromeda Galaxy!


Share this post! Facebooktwitterredditpinterestlinkedintumblrmail

M42 The Orion Nebula, revisited

If you have been reading since the beginning you know that my second target for AP, and really more of an afterthought at the time, was the Orion Nebula M42. I was not at all pleased with the image, too many problems to really even get started. Now, a few months later, I had some ideas on how to correct some of those issues.

M42 the Orion NebulaHere is my original image of the Orion Nebula for comparison:

Original image of Orion

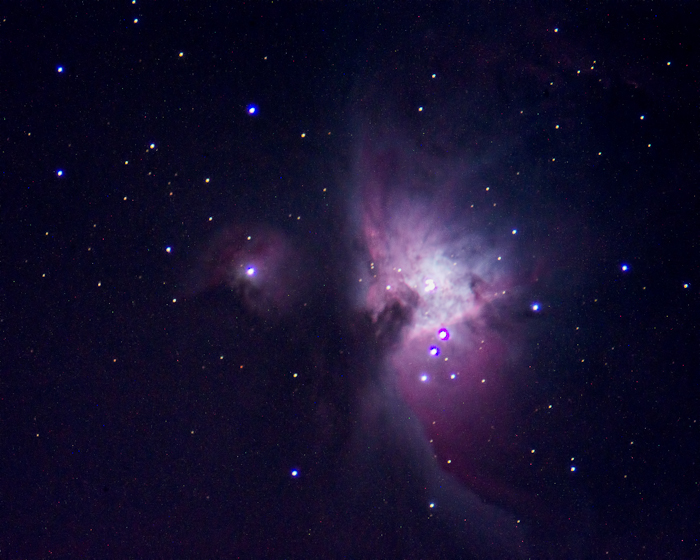
  A little better image of M42 don’t you think? I started off with of course better focus, then added better tracking, and lastly applied a little of my daytime photography knowledge and tricks to it making an HDR image to deal with the really bright core vs very dim outer dust lanes.

In this one image are stacks of 5 second, 10 second, 15 seconds, 30 seconds, 45 seconds, 60 seconds, 120 seconds and finally 180 seconds images. Each stack is then combined using HDR Efex pro to create the composite and then stretched in Photoshop. That’s 90 lights, 20 darks and 20 bias all combined into this one image. Funny thing is Messier 42 is one of the brightest objects in the sky and can clearly be seen with the naked eye as a fuzzy patch in the sky at below Orion’s belt. Yet even for being this bright it is the hardest object I have shot to date with all this combining and processing.

If you want a little more comparison, check out the Messier 42 image shot by the Hubble Space Telescope. Obviously mine don’t even hold a candle to what the Hubble can do but it is very interesting to see the same details in both images and realize I gathered much of the same data with amateur gear. That is simply amazing. It also really makes me strive to see what else I can accomplish.

Thanks for looking at my Orion Nebula images!


Share this post! Facebooktwitterredditpinterestlinkedintumblrmail

Solar imaging first attempt

Solar imaging solves the problem of always being asleep during the day and imaging at night (what AP guy actually has a day job? heh). I wanted to play around a little with solar and see if I liked it. If I do, of course there are dedicated Ha and Ck solar telescopes which are fairly expensive that I can use to do some pretty impressive solar work. For now though, I purchased a Thousand Oakes full aperture glass solar filter for my main scope to see what it could do and here is my first attempt at solar imaging:

Solar imaging   But just an image is not enough, I need to learn something:

annotated solar imaging So off I go researching sunspots, they have numbers you know 🙂 Not only is solar imaging fun and a great way to use your equipment during the day, but it also can help you learn more about the stars. When you are imaging thousands of stars at night it is hard to think about what all is happening on the surface of each star. With solar imaging you can watch the sunspots move across the face and know that the sun is just as much a living thing as you are.

It also makes a fantastic outreach tool as sometimes it is difficult to get people together after dark, particularly children and their parents. If you want a great use of this for outreach, any DSLR with live view becomes and excellent real time solar image capture device which can easily be put on a computer screen. You can also use any video camera you can attach to a eyepiece or telescope as solar imaging cameras.

I simply bought a nice glass solar filter for my primary imaging system and added some solar observing glasses to create an excellent solar photography kit.

Hope you enjoyed my first attempt at solar imaging!


Share this post! Facebooktwitterredditpinterestlinkedintumblrmail

Orion Skyview Deluxe 90mm f/11 refractor

After purchasing my Orion Skyview Deluxe I thought I would share my thoughts on it.

Imaging can take many hours without touching anything. You just sit there. Sometimes I read, sometimes I watch TV, sometimes I browse the internet. Why not look around at the sky? So I found an Orion Skyview Deluxe on the bay that I liked, first because it was a refractor and I really like my refractors, second because it was kind of a classic from the 1980s or 1990s, and thrid because it was Orion and I really like my Orion stuff. I managed to get it for what I though was a reasonable price, just under what a new Orion Astroview 90mm would have cost and this one had a better mount and polar scope to boot. When it arrived there was a problem, they had not packed it well and the top plate where the scope mounts was broken:

Broken mount adapter  

So I emailed Orion, I could hear the laughter from here, no, there is no replacement part for an Orion Skyview Deluxe. I tried Astromart, dead silence. I tried a local welding shop, they laughed saying it was cheap pot metal and there was no way to repair it. They did however suggest a machine shop. After talking to Pat at ELM Machine in Oakhurst it seemed he was confident he could make a new one better than the old, and here is what he came up with:

New custom adapter   This isn’t “better” than the original, this is WAY WAY WAY better than the original! Excellent work Pat! Now my scope is in service and I will have more to do than read or watch TV while imaging for more than eight hours a night.

Orion Skyview Deluxe with new adapter I like this scope so well that even when it is not in use it is assembled and sitting in my living room where I can swing the scope around to look out the back window. I can also carry it through the sliding glass door and set it on the back upstairs deck. With a low power eyepiece the Orion Skyview Deluxe is a wonderful scope for watching the buzzards sitting in the tops of trees.


Share this post! Facebooktwitterredditpinterestlinkedintumblrmail