Quite a while back I received an Explore Scientific Diagonal model DD02-00CF with a telescope and was less than impressed. It gave terrible views and made odd noises when you rotated it in your hands. I didn’t think much of it as I had a very nice Orion 8727 2-Inch Dielectric Mirror Star Diagonal which I was using so I just chunked the Explore Scientific Diagonal in a box.
Lots of time passed and I really wanted to have another nice diagonal to leave in a refractor that sits on a mount in my living room all the time. I had recently upgraded its focuser to a nice 2″ dual speed crayford and wanted it to have its own diagonal all the time, it was a grab and go scope.
So I pulled out the Explore Scientific diagonal and was determined to figure out what was going on. Although I had an explore scientific refractor telescope, the AR127, and it was not a bad scope for the money, I really didn’t see how they could have that bad of a diagonal (it was worse than the super cheap one that came with little beginner telescopes, by quite a lot).
I started by double checking my memory to make sure it wasn’t me since I really did not spend a lot of time with it back then because I didn’t have a use for it. Taking it out and turning it over in my hand, sure enough, there was a clanking and some rattling. A quick view up to Orion in my grab and go telescope confirmed what I remembered, terrible views.
Back inside I took a close look at the Explore Scientific Diagonal and saw four allen head screws in the bottom which all appeared to be loose. I found an allen wrench that fit and very slowly attempted to tighten them. Since I did not really know what they did (although I had a suspicion) I put virtually no pressure at all on the wrenches, only attempting to run them in until there was any resistance at all.
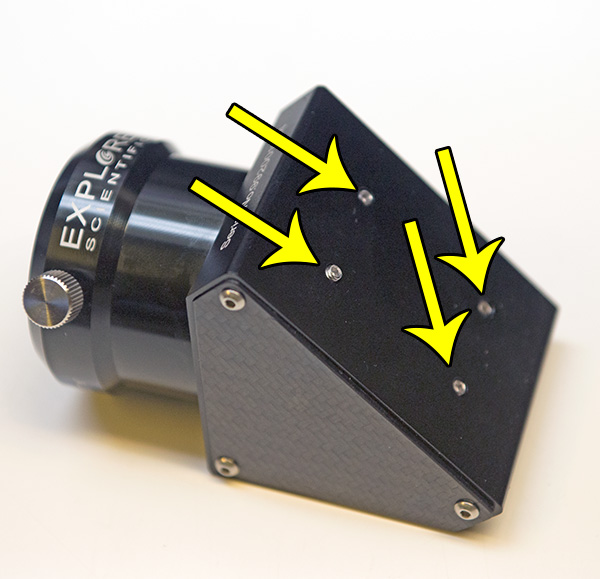
Two screws on one side met some resistance so I stopped immediately, the two on the other side seemed to offer no resistance at all and I finally stopped once I felt that they would come out inside the diagonal. This was really confusing.
At this point I felt I had nothing to lose so I decided to disassemble the entire Explore Scientific Diagonal.
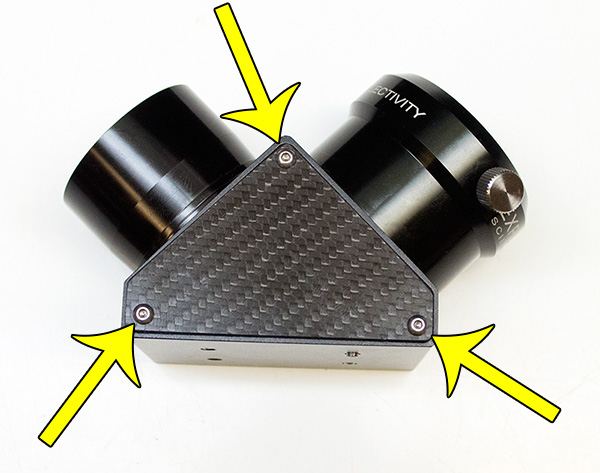
To start with each side has three allen head screws holding the side plate on. Once the screws are removed it is still a little of a challenge to get the sides off as they appear to be stuck. The challenge was getting the side off without throwing the rest of the diagonal across the room. I found that removing the portion of the diagonal that fits into the telescope tube by turning it counter clockwise helped considerably as I could put a finger into the hole and push out on the side plate.
At this point I could clearly see what all was going on and why the Explore Scientific Diagonal did not perform like it should.
The mirror inside is in a bracket which is held to the housing by two screws on each side. The allen screws on the bottom of the diagonal then screw up into the housing and press against the back of the mirror allowing you to align it. This was what I had assumed so it was nice to get some confirmation, and this is also why when I was tightening those allen screws I put no pressure at all on the screws.
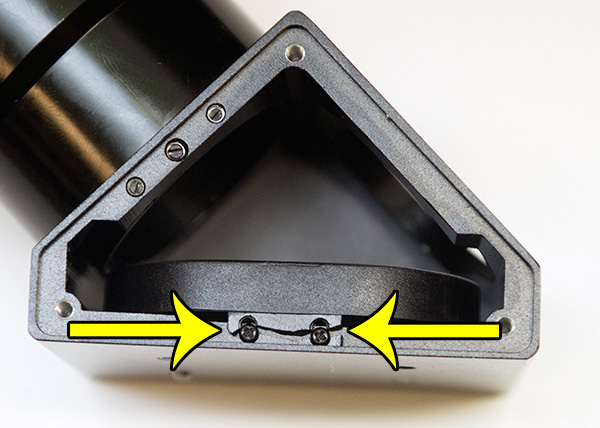
The problem as I found out was that the mirror holder is very thin plastic. How thin? 1.44mm according to my calipers. To give you some perspective, the side plate whose sole job it is is to keep out dust and light measures 1.8mm. For those of you who are in the US, between the thickness of a dime and a penny.
This means that the entire weight of the mirror is being supported by two pieces of plastic like that, one on each side. Just a tad too much force on the allen screws or one really good bump and they would easily snap, which this one did, probably in shipping since it was defective when I received it.
Now I am a firm believer in the fact that if you make enough of anything, you will make a bad one. No big deal, get it fixed and move on. I will never fault a company for a single defective item, or even several of them if they take ownership and fix it, stuff happens.
The problem here is not with the fact that I received one that is broken, that could have easily been the delivery driver dropping my package off the back of the truck, hardly Explore Scientific’s fault.
The problem with this Explore Scientific Diagonal is with the idea of holding that mirror with that little thin piece of plastic in the first place. Any engineer (or even someone who slept in a Holiday Inn Express last night) should immediately know that is a bad idea even if the mirror did not have adjustment screws behind it that could potentially be over tightened. Add in those adjustment screws and that is just blatant stup…… nope, not going to say it.
So why not just get it replaced under warranty and move on? The warranty on this Explore Scientific Diagonal has expired and even if I got a new one, if it had the same design I would not want to use it in fear of it breaking in the field. I am too old to play the break -> warranty -> break ->warranty game.
Conclusions on the Explore Scientific Diagonal
There is so much good quality stuff out there today for me to put up with stuff made like this, particularly since it carries a premium price tag. Sure, it is cheaper than a $320 Tele Vue Everbrite 2″ diagonal, but when you can get a 2 dielectric diagonal like the Solomark 2inch Explorer Enhanced Dielectric Diagonal for under $100 or get a really nice Orion 8727 2-Inch Dielectric Mirror Star Diagonal for around $150, why put up with this one?
Since I personally have had less than stellar dealings with the explore scientific company, had mediocre experiences with their telescope, and now this issue with their star diagonals, I am going to steer clear of their products personally.
I hope you enjoyed this explore scientific diagonal review!
Share this post!